
Now that the new DaVinci Resolve panels are announced, I wanted to weigh in on a few of my own observations, as I’ve been hands-on with them for a little while. All the normal caveats, take what I say with the appropriate grain of salt since I work with DaVinci and I’m obviously biased.
In a nutshell? I think they’re really nice.

The DaVinci Resolve Mini Panel next to my “maxi” panel, comparing for size
But here are some specifics. The layout is, in my opinion, well thought out. I especially like that the bottom half of the Mini Panel is exactly the same as the Micro Panel, so if you use one, the muscle memory you develop applies to the other. Working my way through the different sets of controls, I find I can quickly access most of the soft-mapped tools I regularly use, including the Custom and HSL (Hue) Curve knobs, Log and Offset controls, different windows, and RGB pots.
With 20 knobs, eight of which are remappable and 12 of which are permanently mapped to some of the most common controls you use (including the Y Lift, Y Gamma, and Y Gain controls of which many Resolve colorists are so fond), this panel provides great simultaneous access to controls. The three grids of buttons, two to the left and right of the displays, and one to the right of the trackballs, are logically arranged and provide access to an excellent selection of the most frequently executed commands by the Resolve colorist. Everyone will undoubtedly be missing something they’d like to add, but there are few buttons that I think will not see use. Finally, a set of eight remappable buttons along the top round off what’s available. Blackmagic Design have jammed a whole lot of controls into a reasonably compact and portable control surface, and have done so with a layout that doesn’t feel cramped.
As a regular user of what is now called the Advanced Panel, the trackballs, master contrast wheels, and knobs of the Mini Panel all feel as good (or even a tiny bit better) than those of my big panel. The trackballs are a bit smaller than those of the Advanced, but to my hand it’s a negligible difference. Bottom line, these controls on the Mini Panel have all the smoothness and solidity of the Advanced Panel, with the added bonus that the wheels and trackballs can be disassembled for cleaning, a really handy thing for something small enough to drag around on set.
The buttons are completely different to those found on the Advanced. While the Advanced Panel has hard plastic buttons that clack when you press them, the Mini and Micro Panel buttons are softer and make a much softer thump when pressed. They have definite positive feedback when you press, you won’t wonder when the button engages, but because of their design there’s a double-thump to each button press, once when you press down, and again when the button springs back up. It took me a little getting used to, but it’s not bad, just different. The buttons are backlit (white), so you’ll see them in the dark, and brighter buttons indicate when you’re in a particular mode.
The displays of the Mini Panel are beautiful, nice and sharp and crisp. The design of the menus that appear on them is really nice, with a good mix of icons (where it makes sense), labels, and values to show you what controls are available for each palette of color correction you can access.


One thing I really like is the new page system this panel introduces, that lets you move left and right through different pages of controls for palettes that have more controls than can be simultaneously displayed with the available two displays, eight mappable knobs, and eight mappable buttons.

Custom curves controls
Any palette (accessed via the grid of buttons to the left of the displays) that have multiple pages of controls display dots under the page label text, with the number of dots showing how many pages are available. You then use the Left and Right arrow buttons to access each page. It’s logical, it’s quick, and it feels very straightforward. Additionally, some palettes with different modes of operation expose each mode as a button at the top of the screen (this can be seen in the image above). So, it’s really fast to jump to the curve, qualifier mode, or sizing mode you want to use.
I especially like the Offset button that’s front and center, right above the gamma trackball. I don’t mind saying that one of the things I find a pain in the neck about the Advanced Panel is that it’s easy to forget whether or not the fourth trackball is set to Offset. With the Mini Panel, pressing the offset button dims the All and Level reset buttons of the Lift and Gamma controls, giving you a visual cue that the right-most trackball is now adjusting Offset. Since this button is so handy (as is Log), it’s easy and fast to switch the trackballs and rings among Primary Lift/Gamma/Gain, Log Shadow/Midtone/Highlight, and Offset as your mood takes you. As an added bonus, when you’re in Offset mode, the left and center rings adjust Temp and Tint (in case you’re wondering why no Temp and Tint controls along the middle row of knobs).
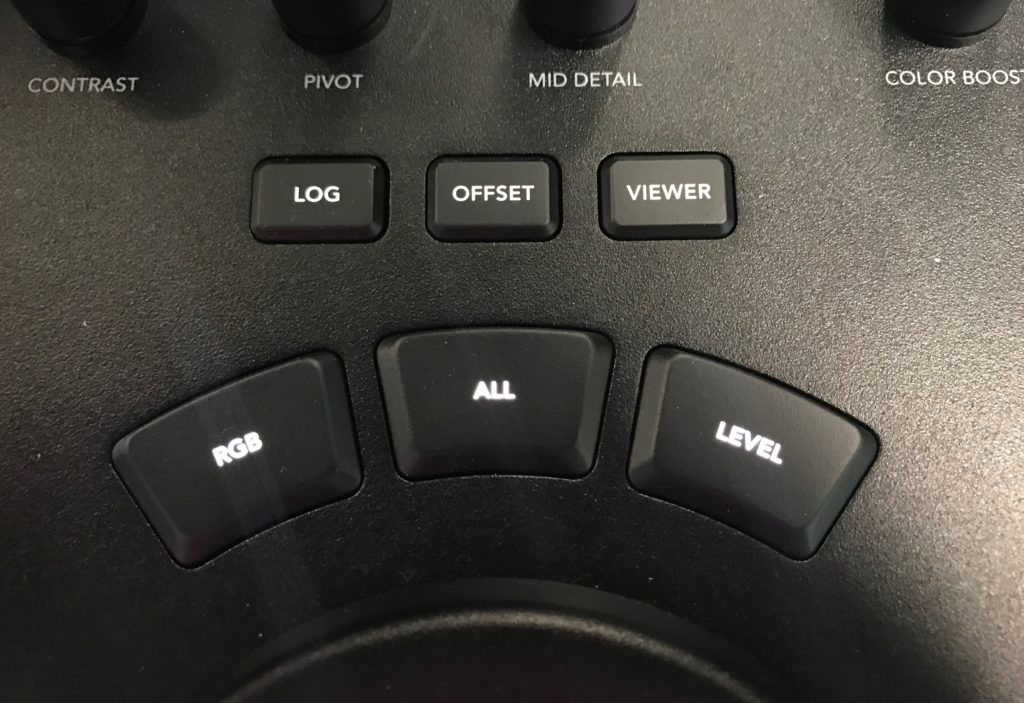
The offset control
When it comes to plugging the Mini Panel in, I really like that it has both USB-C and Ethernet connectivity. USB is nice and simple, but being able to connect Ethernet for long distances cheaply is a really nice option to have. It’s also really cool that you can power the panel over Ethernet as well. I also like that the new version of DaVinci Resolve 12.5.5 that’s been updated to be able to use these panels can auto-sense when the panels are plugged in via USB-C. If you’re connecting via Ethernet on macOS or Windows, a popup in the Control Panels panel of the preferences lets you choose your panel from a list (Linux users have to enter the IP address of the panel manually).
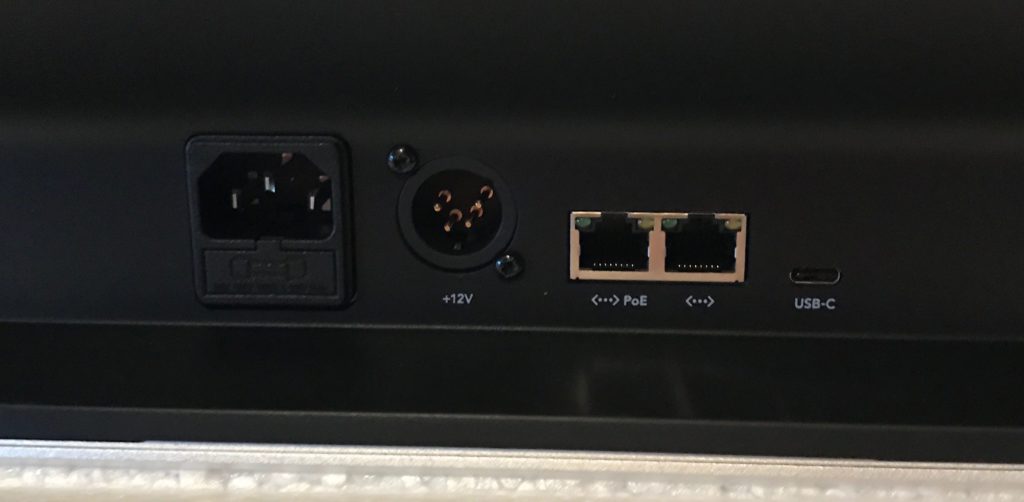
Mini Panel connections
Dedicated power connectors include a standard AC computer plug, and a 4-pin XLR connection suitable for grabbing power from a variety of situations on set, so including the PoE option, you have a lot of ways to get this thing turned on.
I should probably mention that the Micro Panel only has USB-C, so if you want the other connectivity options, you’l need to get yourself the Mini.
Interestingly, I’m told that the USB-C port can provide power out to other devices when this panel is plugged in via the AC computer plug. That means if you’ve got a new computer or phone that can get power through USB-C, you can use the panel to use and charge it.
So, if you’re a DaVinci Resolve colorist who’s in the market for a set of panels and you can’t afford the $30,000 Advanced Panels, the Mini Panel is a fantastic choice, especially at $2,995 USD. The only caveat I would mention is that this panel only works with DaVinci Resolve. If you’re someone who uses a variety of panel-aware applications and you want a panel that can drive them all, you’ll want to look to Tangent Design, Avid, JL Cooper, or OxygenTec.
However, if DaVinci Resolve is your grading tool, you’ll be well served by these new panels. As always, I recommend finding somewhere you can give them a try first, before you throw your money down. Control surface touch and feel are an incredibly subjective thing, and just because one person likes the feel of a knob, trackball, ring, or button is no guarantee that another person will like it just as well. Hooray for choices!
5 comments
thanks alex!
Thanks for this!
My very first reaction to the Micro was that it might be a better choice than a Wave – more compact, less plastic, more robust, better button-mapping. No apparent jog knob, but who would use it? My bet is that most colorists either Next-Next-Next or Play Forward/Reverse anyway. Feel free to disagree, I’d like to know. Highly amused to see the Mid-Tone Detail front-and-center. Instead of buried three submenus down. Gee, who requested that? [smiley]
For expanded utility though, the Mini kind of looks unbeatable for the operator who wants to go all-in with Resolve as their everything end-to-end platform. At the price point it is, the choice would be between it and a full set of Elements – aware of course that Tangents work with a wide array of other applications, like Premiere and FCPX as an edit interface. If they worked with Media Composer the same way, the only distinguishing criteria would be the RGB correction joyballs/rings. Which obviously is paramount for grade.
I do not work for BMD.
Waiting for Vegas.
Thanks for the early review!
Thanks for the quick tour Sir.
Quick question: with the Mini, is it possible to invert a mask, as well as creating an outside node? Thanks again.
Yes, you can. Not with the micro, though.