If you’re reading this, you probably already know the public beta of DaVinci Resolve 10 is available for download, soon to be followed by the final version. As is usually the case, I had to turn over the User Manual (also in beta) to production much sooner than the software was actually finished in order to create the final layout. Because the DaVinci engineering team is so ambitious, this means a few new features were slipped in at the last minute that either aren’t in the manual, or are easy to miss. Here, then, is a short list of some great new features you should know about, lest they slip beneath your radar.
Importing Media into a Blank Project Updates Project Settings
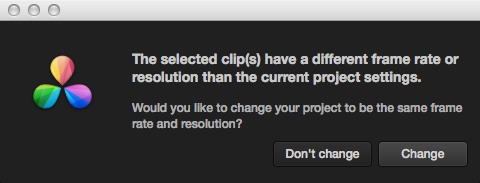
A welcome update, if small, is an automatic prompt whenever you import media into an empty project that lets you change your project settings to match the incoming media. No more accidentally creating quick projects for dailies processing that accidentally have the wrong frame rate.
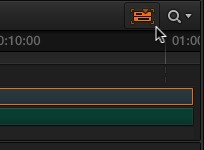
Speed Change UI in the Edit Page
A late-breaking feature is a new “speed widget” for creating multi-speed effects in the timeline of the Edit page. Select any clip and press Command-R (for “retime”) to turn a clip into a speed effect clip.

A new UI for multiple-speed changes in the timeline.
Once the clip has been set up as a speed change, you use the pop-up menu at the bottom to set speed handles at the position of the playhead that you use to retime clip speed segments. Once handles have been added, you can drag them to the left or right to create fast or slow motion effects. Clicking the close button at the upper left-hand corner of the speed widget hides the speed controls, but a stopwatch icon in the collapsed clip shows you it’s a speed effect, and you can press Command-R again to open the speed controls back up for further manipulation.

The pop-up menu you use to add speed handles and choose from preset speed settings.
This pop-up menu also has options for setting speed segments to preset speeds, reversing clips, and adding speed ramps to ease into or out of speed changes.
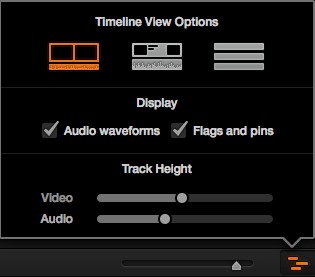
Independently Resizable Video and Audio Tracks
This one’s actually in the manual, but it’s easy to overlook. You can choose separate sizes for the video and audio tracks in the timeline. Handy for prioritizing space in the timeline depending on whether you’re working on the audio or video of your program.
Composite and Transform Settings in the Title Generators
This was a late-breaking feature that I wasn’t able to demo in any of the available videos, and that isn’t yet in the manual. There’s a set of composite, transform, and cropping parameters available at the bottom of the Inspector when you select a text effect in the timeline. These can be used to blend text into superimposed layers using any of the available transform modes, and to fly text around using keyframable pan/tilt/zoom/rotation and anchor point parameters.
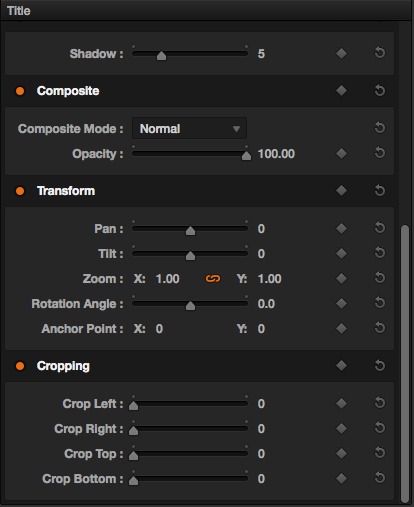
Composite and transform settings are available in the Inspector for blending and flying text generators around.
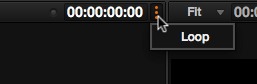
Where’s the Loop Option in the Edit Page Viewers?
In the event you were looking for the Loop control in the Edit page, it’s a menu item in the Option menu (in the upper right-hand corner) of each of the Viewers.
Duplicate Timeline
FINALLY! I’m as excited about this small but meaningful feature as you are. Simply right-click any timeline in the Timelines list to access options to rename, duplicate, and alter the timecode of timelines. More than any other new feature, this makes me want to buy the whole engineering team beers.

Append At End and Select Clips Forward Key Shortcuts
This is in the category of features it’s easy to think Resolve doesn’t have because there’s no visible control. There’s a whole edit method hidden in the Edit menu, “Append At End,” which does exactly what it says. Additionally, there are commands to “Select Clips Forward” on the current track or all tracks. You can either use the Edit menu items, or the corresponding keyboard shortcuts shown below to initiate these commands.

Hidden features in plain sight
Copy and Paste Grades in the Color Page
In the Color page, you now have a new way of copying grades. Simply select the thumbnail of any graded clip and press Command-C to copy the grade, then select another clip and press Command-V to paste the copied grade. As an added bonus, keyframes and motion tracking are also copied and pasted when using this method.
You should note that if you don’t want to copy tracking data and keyframes, you can still use the middle-mouse button method of copying grades.
Apply Grade Keyboard Shortcuts for Everyone
This one actually is in the manual, but I wanted to point it out to make sure you knew about it. Two features long enjoyed by owners of the DaVinci Control Surface are “Apply Grade From One Clip Prior” and “Apply Grade From Two Clips Prior.” They’re fantastic for rapidly moving through scenes shot with coverage when doing shot matching, and they’re now available to the masses via two keyboard shortcuts.
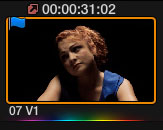
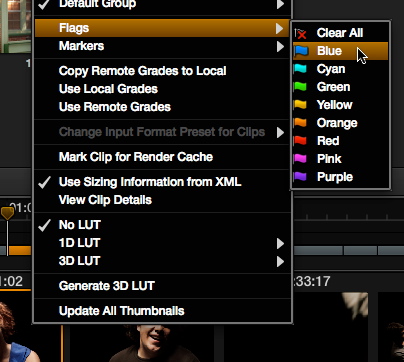
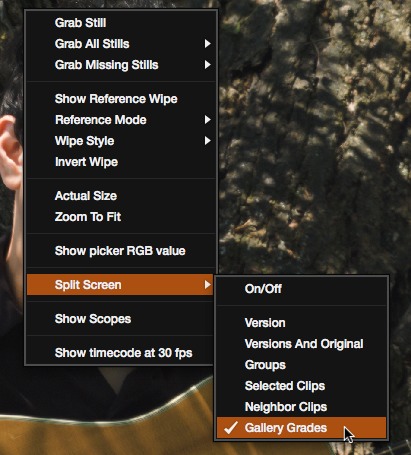
Split Screen > Gallery Grades
This is a feature I actually hadn’t seen until hitting the show floor at IBC (proving the DaVinci team surprises everybody). More options have been added to the Split Screen submenu for creating whole frame side-by-side comparisons in the Viewer of the Color page, and all of these options are now available in the Viewer submenu, which is very convenient.
Split Screen options in the Viewer submenu.
One late-breaking new feature is “Neighbor Clips,” where you see a four-up display showing the current clip next to the previous and next clips in the timeline, automatically. However, another new feature that bears a bit more explanation is “Gallery Grades.” Basically, once you choose this option, any saved grades you select in the Gallery of the Color page are displayed side by side as they’d appear applied to the current clip. This can be seen below.
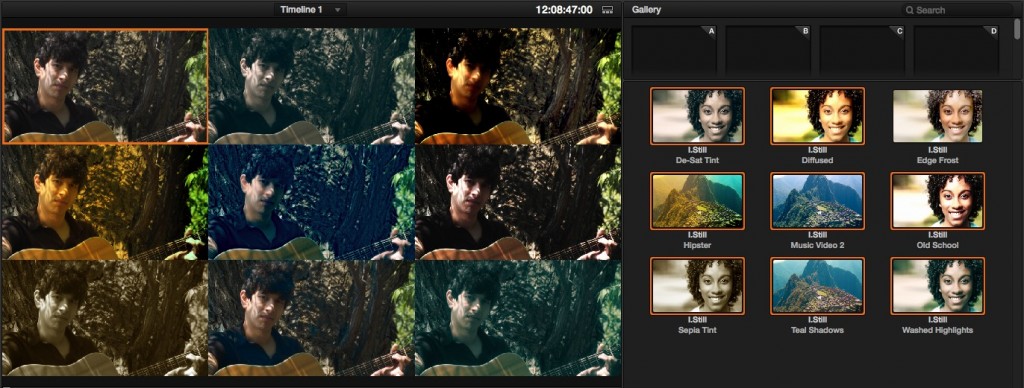
Using Split Screen > Gallery Grades to preview different grades as they’d look on the current clip.
This’ll be a really useful feature for style-intensive projects in which you want to raid your personal collection of swank looks, and you want to preview a selection for your client. Like all the other split screen options, this will be displayed on your hero monitor via video out.
Grab Missing Stills
Another small new feature is “Grab Missing Stills,” which only grabs stills from clips you haven’t saved stills for already. This is useful for timelines where you’ve already saved a set of archival stills in a gallery, but in which you’ve added some shots that you’d also like to archive without spending time overwriting everything you’ve already saved.
Shape Presets UI
This made it into the manual, but it seemed worth pointing out here since it’s quite useful, but may not be immediately obvious. If you’ve created one or more windows that you think will be useful to apply to other shots later on, you can save and recall them using commands in the Window palette’s Option menu.
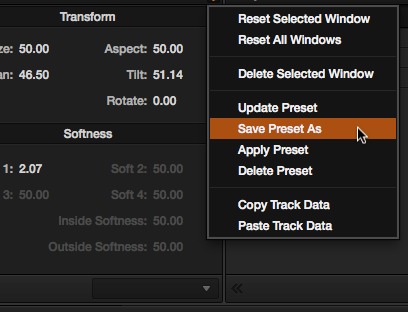
Saving preset shapes
Choosing Save Preset As pops a dialog you can use to name the window preset.

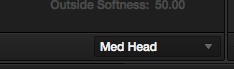
Clicking OK saves your newly named windows preset to the preset pop-up menu in the lower right-hand corner of the Window palette.
To apply a window preset to the current node, choose the window preset you want from this pop-up menu, then open the Option menu and choose Apply Preset. Window presets overwrite any other windows you’ve already set up in the current node, so you may want to create a new node before applying window presets.
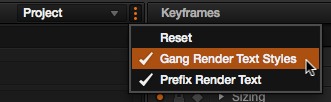
Burn-In Palette Gang Render Text Styles
Another small change that’s easy to overlook is the ability to either gang the styling of all text items you’re burning into the timeline, or to independently style each text item by disabling this option in the Options menu of the Data Burn In palette.
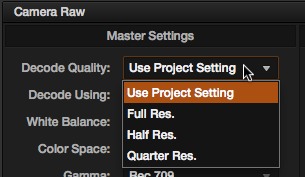
New Camera RAW Settings
Two new items available in the camera raw settings for all formats provide both convenience and quality for folks pursuing raw workflows. The first one, Decode Quality, lets you choose from Full, Half, or Quarter resolution debayer settings for all formats, making it easier to work with camera raw formats on lower power workstations.
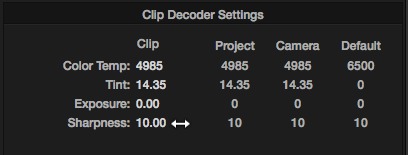
An additional parameter, Sharpness, applies a brand new sharpening algorithm specifically for improving camera raw media conversions should you be someone who likes to add a bit of sharpening (similar to what Lightroom does by default). This new Sharpness parameter is automatically set to 10.
It’s a very subtle adjustment; the two images below show a comparison of the maximum setting of 100 (I cranked this setting to make it obvious) and the default setting of 10. You should zoom in to see the difference more clearly.

A zoom in of maximum debayer Sharpen being applied to a CinemaDNG image.

A zoom in of the default debayer Sharpen being applied to a CinemaDNG image.
Render to AVI
Personally, I can’t remember the last time I rendered an AVI file, but apparently there are still plenty of you who do, and the Resolve team has listened to your pleas.
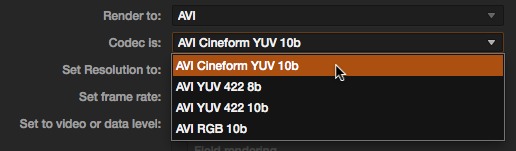
You can now render to the AVI format.
When you choose AVI from the Render to pop-up menu of the Deliver page, you get access to the four codecs that are available to this format. This option is available to Resolve on OS X, Windows, and Linux.
Where Did the Select All Button Go?
Lastly, some folks have been asking where the Select All button I’ve been demoing in the Deliver page went. In a last-minute change, this was changed into an icon to conserve space, but don’t worry, it’s still there.
The now textless Select All button.
There’s Plenty More
That’s all for now, but of course there are many, many more new features available in DaVinci Resolve 10. In the coming weeks, I’ll be working with Ripple Training to create a new features tutorial specifically for covering all the changes for folks who’ve purchased my Resolve 9 training title. Until then, this and the manual should get you started with this big new release.