Here’s a small but useful tip I put up on Twitter, but given how ephemeral Twitter is, I thought I’d elaborate here. It’s about highlighting keys in DaVinci Resolve.
As of Resolve 7.1, there are two keyboard shortcuts for showing a highlight with which to evaluate the isolation you’re doing with either an HSL Qualifier (a key) or with a Power Window (shape), or even to view the interaction of the two. Shift-H for a regular highlight, and Control-H for a high-contrast highlight (both key shortcuts toggle the highlight on and off).
In this example, I want to isolate the highlights of the water in the following shot:
Assuming a sunny day, and a camera angle that’s near the surface of the water, lakes and ocean scenes tend to be two-tone, with highlights reflecting the color of the sky, and shadows reflecting the quality of the water (I plan on talking more about the color of water in a future post, it’s actually quite interesting).
By isolating the water highlights using an HSL Qualifier, I can manipulate the water color while at the same time keeping some interesting color contrast and interactions with the original color of the water shadows.
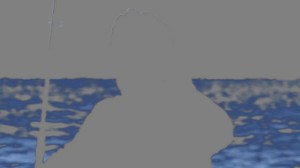
While I create and adjust my secondary qualification, there are two ways that I can preview the key I’m generating with a highlight. The default highlight that Resolve uses can be toggled on and off using Shift-H (this is also the default highlight you’ll get if you use the button on a WAVE) and shows the selected portion of the image with the original colors, and the unselected portion of the image with a flat gray:
While this view took me a bit of getting used to at first, it’s grown on me, and I now find it really useful to get some perspective on how the isolated portion of the image looks while I’m fine-tuning the key.
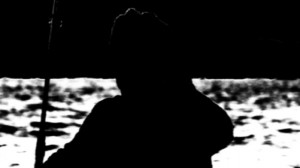
On the other hand, by pressing Control-H you can also show what’s called a “high-contrast black and white” highlight (so named via a checkbox in the Settings tab of the Config page that lets you change the default highlight that’s turned on via your WAVE button):
This high-contrast highlight should be familiar to you if you’ve used other color correction applications and plugins; it’s a more typical display wherein the selected portion of the image is white, and the unselected portion of the image is black.
I find this high-contrast highlight is useful in situations where I’m trying to eliminate holes in a key, or evaluate how “chattery” a key is since irregularities are easier to spot when divorced from the original image. For example, the black & white highlight makes it easier to see the unwanted top portion of the man’s head that’s gotten selected along with the water. I’ll want to do something about that…
The great thing is, via either keyboard shortcuts or macro remapping to a multi-button mouse or other device, you have the option of easily and quickly switching between the two, or turning them off, as you see fit. It’s really handy!


2 comments
Is there any setting that will automatically turn on the Highlight when you use the color picker in the Qualifier? Or do you always have to hit the icon or Shift H?
Thanks.
You always have to click the button or press Shift-H. It’s a tough call between automatic behaviors that are useful, and those that may get in the way by activating when you don’t want them to. It’s an interesting idea, though.