It seems like just yesterday that DaVinci released version 8.0.1 with its new color balance control interface, and DaVinci Lite, a free 2-node and HD-limited version. But, not content to rest on their laurels, DaVinci has eliminated a decimal place and announced DaVinci Resolve 8.1, with even more feature enhancements. Most are subtle, but welcome additions to a variety of users.
Top of the list is is enhanced AAF round trip support. A new Format popup in the Export Session dialog (that appears when you click the Export button in the Conform page) lets you choose whether to export XML or AAF (previously it only expoted XML). Choosing AAF generates a file for Media Composer that can be directly relinked to the media you output from Resolve.
Furthermore, when importing AAF files, Resolve now reads a variety of video transitions (dip to color, wipes, and iris transitions), composite modes, and transform parameters into your session. This will be welcome news for colorists wanting greater effects fidelity from project import.
Incidentally, transforms from Final Cut Pro (Position, Rotation, Scale) are now imported from XML projects, allowing you to render these effects using Resolve’s superior transform algorithms.
For those of you using EDLs day in and day out, a new contextual menu command–available from the Conform page’s Timeline–lets you load an EDL directly to a new track. If you’re the kind of person who needs this, you’ve just now come up with three different ways you’ll use this feature.
Next up is support for the new ACES “Academy Color Encoding Specification” standard. While comparatively few facilities need ACES right this second, it’s becoming clear that ACES is the future of media exchange in post, and DaVinci is being foward-looking by its inclusion. ACES support can be seen initially as a new option in the “Color Science Is” popup of the Project tab.
With “DaVinci ACES” selected, two new popups appear in the LUTS tab, which allow you to choose an Input Device Transform (a characterization of the source camera), and an Output Device Transform (a characterization of the target display or projector).
Finally, contextual menu item available from the thumbnails within the Browse and Color pages allow you to redefine the Input Device Transform on a per-clip basis, in cases where you’re mixing media from different cameras.
While we’re looking at per-clip options, a new contextual menu item for clips in the Media Pool lets you redefine the individual Data Level of clips. In previous versions of Resolve, the Data Level was a project-wide setting that determined which digital values in your source media mapped to the minimum and maximum levels in Resolve. In a nutshell, Y’CbCr source media typically used the “Normally Scaled Legal Video” setting, while RGB source media (think film scans) used the “Unscaled Full Range Data” setting.
However, you were in trouble if you had a mix of both kinds of media. Now, you can use this Media Pool submenu command to individually redefine clip data ranges in this situation.
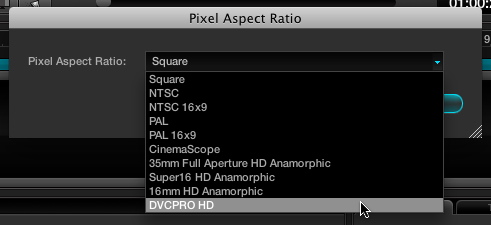
If you’re still working with DVCPRO HD media (I continue to have documentaries coming in using this format), you’ll be pleased to know that DaVinci has finally added the DVCPRO HD pixel aspect ratio to the PAR dialog box.
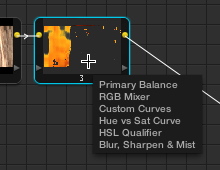
Now, all these workflow features are nice and all, but there are also some solid additions for grading and effects. For example, if you hover your mouse over a node in the node graph, a tooltip appears showing you what adjustments have been made within that node, giving you an organizational heads-up.
Not impressed yet? Well, the Layer node, which until now simply combined multiple input nodes according to order and opacity (set via the Key tab’s Post Mixing Gain slider), now lets you choose a composite mode to use to combine all of the inputs. Now all you composite mode junkies can go nuts right from within the Node Graph.
Another valuable little feature is the ability to copy one node’s settings (select the node and press Command-C), and paste them into another existing node in another shot (select another node, press Command-V. Along with all dynamics (marks, or keyframes, whichever you prefer to call them). This is similar to Final Cut Pro’s “Paste Attributes” command, except without any options, you simply copy and paste all settings at once.
Lastly, 8.1 continues to refine the use of the Timeline in the Conform page, enabling you to copy and paste clips in the Timeline of the Conform page. Select a clip, press Command-C, and then move the playhead and click a track number button to determine where the pasted clip should go, and press Command-V. It’s the little things, right?
So those were the features that grabbed my eye. There’s more to the release, but honestly, those engineers deserve a break. And a beer.


3 comments
[…] Blackmagic Design have made a lot of news at IBC this week. Amongst many announcements, today they’ve announced DaVinci Resolve version 8.1. Alexis Van Hurkman has a great breakdown of new features over at his blog. […]
Thanks for the great early review AH. Looking forward to using many of these new features.
Awesome!! Finally, copy-paste! A small thing like this goes a long way! Can’t wait to get my hands on this update!